Classic Pennsylvania Dutch Shoo Fly Pie
Craving the best shoo fly pie recipe? Try this tender, sticky, molasses-based pie with crumb topping—perfect for cozy family gatherings or holiday baking. Learn how to make pie that everyone loves!

Ever wonder about that warm, sticky smell that seems to drift from grandma’s oven and makes you think of cozy sunday afternoons? i sure do.
And let me tell you, nothing hits that nostalgic spot quite like a slice of good ol’ shoofly pie . honestly, i’ve always been captivated by its sweet, tangy charm—and how it somehow feels like a little slice of american history on a plate.
This shoo fly pie recipe isn’t just a dessert; it's a story, a tradition from the pennsylvania dutch community, that has happily found a home in kitchens all over the country.
Shoo fly pie gets its name from an old legend—back in the day, folks believed the enticing smell of molasses and spices would “shoo away” flies.
Clever, right? today, it’s more about the yum factor. think of a rich, molasses-infused filling nestled in a flaky crust, topped with a crunchy crumb topping that’s just the right amount of sweet and spicy.
Honestly, it’s like a little bite of amish pennsylvania with every forkful.
Now, i’ll admit, this isn’t a quick “grab and go” kind of pie. it takes some time—mainly for chilling and baking—but it’s totally worth every minute.
The prep takes about 20 minutes, then you need to chill the dough for half an hour. after that, it’s baking for about 40 minutes.
So, give yourself around an hour and a half total. and trust me, you’ll be glad you did. it’s a moderate project, especially if you’re comfortable with homemade crusts and whisking together a filling.
In terms of cost , this pie is pretty budget-friendly. most ingredients are pantry staples—flour, butter, molasses, spices—and since it serves 8 to 10 slices, you get some serious bang for your buck.
Plus, the ingredients yield a pie that's packed with flavor, so even if you’re cooking on a budget, this one’s a win.
One of the main reasons i love this shoofly pie isn’t just its taste. it’s packed with benefits —well, somewhat.
Molasses packs a punch of iron and minerals, and the spices like ginger and cinnamon do wonders for digestion and flavor.
Basically, it’s a dessert that feels a tad healthier than your average sugar-laden treat. but let’s be honest—it's mainly about comfort and nostalgia.
And there’s something just magical about serving this pie during the holidays, or even at a casual family gathering. it’s special enough for occasion but simple enough to whip up whenever you’re craving a little slice of americana.
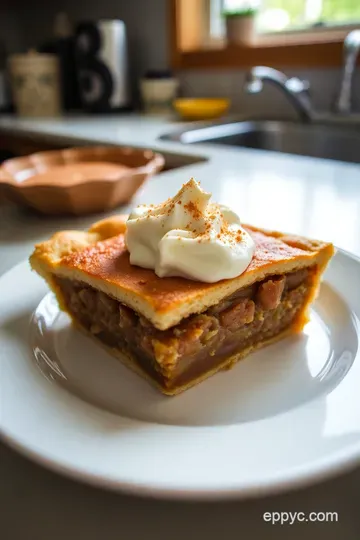
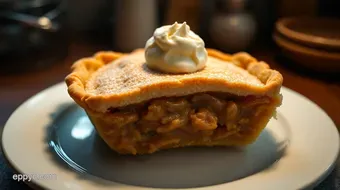
The crumb topping adds a delightful crunch, and the tangy-sweet filling pairs perfectly with a scoop of vanilla ice cream or whipped cream.
Believe me, once you make your own shoo fly pie from scratch, you’ll never want to go back to store-bought.
Now, before we dive into the ingredients, just know—making this pie is a bit of a labor of love. but honestly, it’s one of those recipes that rewards patience and care.
And i promise, the smell alone will make your kitchen feel warm and welcoming. ready to tackle a timeless classic? then let’s gather our ingredients and get started!
Hey there! so, you want to know all about the essential ingredients for making the perfect shoo fly pie recipe ? well, grab a cup of coffee because i’ve got all the good stuff, straight from my kitchen adventures in trying to nail this nostalgic amish pennsylvania treat.
Trust me, once you get the hang of these core components and tricks, you’ll be making pie in the sky in no time.
Let’s start with the Premium Core Components .
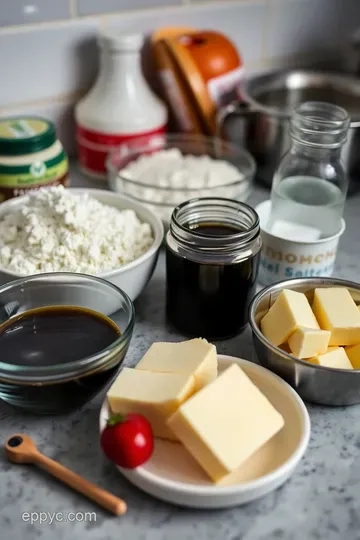
First up, the crust — it’s the foundation, so you want it flaky and buttery. for a classic pie, you’ll need 1 1/4 cups all-purpose flour (150g) and a pinch of salt.
Use cold unsalted butter (about 1/2 cup or 113g) , cut into tiny cubes. i swear, the colder the better! mix it up until it looks like coarse crumbs—think coarse sand—and then slowly add ice water (about 3-4 tablespoons) .
Too much water and the crust gets tough, so go slow.
For storage, keep the dough wrapped tight in plastic in the fridge; it’s good for a couple of days if you’re not baking right away.
When you’re ready, roll it out on a floured surface, and remember— less is more when handling it. too much messing and it gets chewy.
Now, onto that rich, molasses-based filling—the heart of shoofly pie. you’ll need 1 cup molasses (340g) , and a splash of hot water (about 160ml) .
The key is to dissolve a teaspoon of baking soda in a little hot water and mix it into your molasses mixture.
It bubbles up, so don’t panic. the spices? that’s where the magic happens. ground ginger, cinnamon, cloves , and a pinch of black pepper.
I always double the spices just to make sure i get that warm, cozy feel.
Freshness is a big deal here. use fresh spices —they really make the flavor pop. and shelf life? molasses lasts, like, forever in your pantry, but spices lose their punch after a year.
Plus, for the filling, make sure your eggs are fresh and room temp to make mixing easier.
For the signature seasoning blend , think of it as the secret sauce. the spice combos like ginger, cinnamon, and cloves are non-negotiable.
They marry the sweet and tangy molasses and give that nostalgic amish pennsylvania flavor. you can swap out ground spices for regional variations —say, a hint of nutmeg or allspice—if you want a slightly different vibe.
Some folks like adding a dash of vanilla or a splash of bourbon for an adult twist. these aromatics really elevate the classic shoofly pie.
Now, here’s a little pro tip: if you’re out of molasses? honey or dark corn syrup can work in a pinch, but honestly, nothing beats that deep, sticky richness of molasses.
It’s what makes this pie special—this shoofly charm.
Next, let’s talk about smart substitutions . life happens, right? no molasses? use dark corn syrup for a milder sweetness. no eggs? try flaxseed meal mixed with water — it acts as a binder and keeps everything vegan-friendly.
Also, if you’re cooking seasonally, fresh apple slices or chopped nuts can add a fun twist if you’re feeling experimental.
For dietary modifications , always check your ingredients. gluten-free flour blends work fine but might change the texture. dairy-free butter can be swapped in to make it vegan.
It’s all about adapting to what you have on hand while still keeping that pie in the sky magic alive.
Finally, let's chat about kitchen equipment essentials . to make this easier, i swear by a good food processor for mixing your crust and crumb topping.
A rolling pin is a must, and a trusty 9-inch pie dish—preferably ceramic for even baking. if you don’t have one, a disposable aluminum pan can do the job in a pinch.
For storage, keep leftovers covered in the fridge—shoofly pie gets even better the next day! Reheat gently, and you’ll get that warm, sticky goodness again.
Getting all these ingredients, tips, and tricks lined up is the first step. trust me, once you understand the role of each component, how to substitute, and the equipment needed, how to make pie won’t seem so intimidating.
You’re on your way to mastering one of the most iconic life of pie treats.
So, next, i’ll walk ya through how to make pie from scratch—step by step—so stay tuned. because believe me, once you see how simple and satisfying it is to create a homemade shoo fly pie, you’ll never want store-bought again.
Ready to bake some history? let’s do it!
Absolutely! let’s dive into how to master the art of shoo fly pie — that classic pennsylvania dutch treat that’s as cozy and nostalgic as a warm cup of apple cider on a fall afternoon.
Honestly, making pie might seem intimidating, but once you get the hang of the professional cooking method , it becomes surprisingly fun.
Plus, i’ll share some of my real-life lessons, so you can avoid the little pitfalls i’ve tripped over.
Essential Preparation Steps: Setting the Stage
Before you even turn on your oven, mise en place is your best friend. that fancy french term just means “everything in its place,” and trust me, it helps keep chaos at bay.
Measure your ingredients upfront — especially important since that molasses-based filling is sticky and prone to glopping. get your flour, sugar, butter, and spices all ready to go.
Time management is key here. while the pie crust chills in the fridge for about 30 minutes , i like to get my filling boiling and bubbling.
That way, once the crust is ready, everything comes together without rushing. organization-wise, i recommend setting out your tools — rolling pin, pie dish, whisk — so nothing’s scrambling your focus when it’s time to assemble.
Safety-wise, don’t forget to handle hot liquids carefully. molasses and hot water can splash unexpectedly if you’re not paying attention.
And if you’re working with raw eggs in that filling, make sure your utensils are clean to keep everything safe.
Step-by-Step Process: From Kitchen to Oven
Here’s where the magic happens, but I’ll try to keep it simple with numbered steps so you can follow along easily:
-
Prepare the crust first. mix 1 1/4 cups flour with a pinch of salt, then cut in the cold butter until it looks crumbly.
Add about 3 tablespoons of ice-cold water little by little until the dough just comes together. wrap it in plastic and chill for about 30 minutes at around 40° f ( 4° c) .
-
When ready, preheat your oven to 375° f ( 190° c) . roll out the chilled dough on a floured surface to fit a 9-inch pie dish.
Transfer it carefully and crimp the edges.
-
Make the filling. in a saucepan, simmer 1 cup molasses with hot water and your spices (ginger, cinnamon, cloves, black pepper).
Once hot, whisk in 2 eggs and then dissolve 1 teaspoon baking soda in a splash of hot water before adding it to the mix.
Keep stirring gently to avoid curdling. cook until it thickens slightly — about 5 minutes. pour into your prepared crust.
-
Crumb topping time. Mix 1/2 cup flour, 1/3 cup brown sugar, and 1/4 cup cold butter until crumbly. Sprinkle evenly over the filling.
-
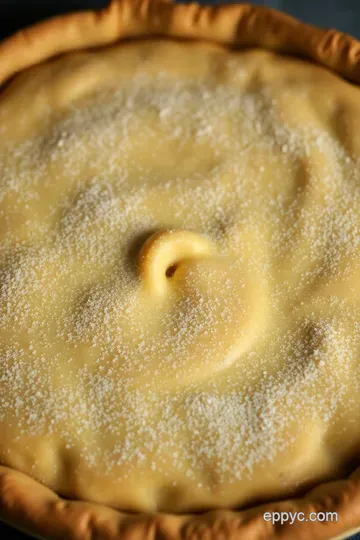
Bake uncovered for about 40 to 45 minutes until you see the filling bubbling along the edges and the topping turning golden brown .
A good visual cue is the puffed, crisp topping and slightly shiny filling — that’s when you know it’s done .
-
Let your pie cool for at least 15 minutes before slicing. this helps it set; otherwise, it’s gooey mess.
I like mine warm with a dollop of whipped cream — totally adds to that life of pie moment.
Expert Techniques & Handy Tips
Mastering how to make pie is all about critical steps. use cold butter and ice water to keep that crust flaky.
When you're cutting in the butter, aim for pea-sized lumps — that’s what creates that melt-in-your-mouth texture.
Temperature control during baking is also essential. too hot, and the topping burns before the filling sets; too cool, and the pie might come out undercooked.
Remember, oven heat standards can vary, so keep an eye on it starting around the 35-minute mark.
Visual cues matter big time. the pie should be bubbling around the edges with a crisp, crumbly topping . if your crust looks pale or the filling isn’t bubbling, give it a few more minutes.
Troubleshooting? if your filling looks too runny, it might mean your eggs didn't incorporate well or you didn’t cook the filling enough.
If it's overly sweet, remember: balancing it with a dollop of whipped cream can do wonders.
Success Strategies: Avoid the Common Pitfalls
Here's the deal: don’t rush. rushing your crust can lead to a tough or soggy bottom. chill it thoroughly — i’ve learned that the hard way.
Also, when sprinkling the crumb topping, do it evenly. no one wants a pie with a thick, doughy patch — that’s bars and cookies territory, not pie.
A smart move is to bake the pie on the middle rack and keep an eye on it. cover the edges with foil if they brown too fast.
Your goal is that perfect balance of a golden crumb topping and luscious, bubbling filling .
For that make-ahead magic, you can prepare the crust and filling a day before, keep everything refrigerated, then assemble and bake on the day of.
Bonus: leftovers reheat well, so you can enjoy your ‘ pie in the sky ’ science experiment whenever you crave it.
Alright, now we've got the core of how to make pie down. up next, i’ll share some extra tips and info about the history of this delightful shoo fly pie and how it became a staple of amish pennsylvania heritage.
Stay tuned!
Absolutely, let’s dive into the world of classic american desserts with a little personal touch! if you’ve ever wondered how to make pie that’s cozy, nostalgic, and downright addictive, then you’re in the right place.
Today, i want to share some pro tips, presentation hacks, and storage secrets for a really good shoofly pie recipe—that sweet, molasses-laden treat with roots in amish pennsylvania.
And trust me, once you get the hang of it, how to make pie will be one of your favorite skills.
Pro Tips & Secrets from My Kitchen
Honestly, the secret to a perfect shoofly pie is all about paying attention to the little details. for example, chilling your dough is a game changer.
I used to rush through pie crusts thinking it didn’t matter much, but when i started chilling my dough for about 30 minutes, it turned way flakier and easier to roll out.
Plus, it helped me avoid that weird shrinkage or shrinking crust—ugh, we’ve all been there.
When it comes to flavor, i swear by using fresh spices. ground ginger, cinnamon, and cloves really give that warm, nostalgic aroma.
And a neat trick i learned from my grandma— whisk the eggs into your molasses mixture quickly after removing it from heat.
It prevents curdling and keeps the filling smooth as silk.
If you’re short on time, a pre-made pie crust works just fine. no shame here! just blind bake it a little so it stays crispy before pouring in the hot filling.
And, hey, to save oven time, i sometimes bake multiple pies at once—just keep an eye so they don’t overbake.
Perfect Presentation & Visual Appeal
Let’s be honest—part of the fun of pie is how it looks. for my shoo fly pie , i love using a rustic crimped edge —makes it look homey and inviting.
When it’s cooled just enough, i sprinkle a pinch of extra cinnamon on the crumb topping to enhance that warm, cinnamon-y scent.
For garnishes, a dollop of whipped cream or a small scoop of vanilla ice cream instantly takes it to the next level.
I also like to add a little edible gold dust on top for those fancy dinner parties. bright-colored fruits like berries or a drizzle of caramel can bring a modern twist and a pop of color that makes it irresistible.
The biggest visual tip? keep the topping chunky—not too perfect. it’s supposed to look a bit “earthy,” displaying that crumbly goodness.
A clean, inviting presentation with a slice served on a pretty plate makes all the difference.
Storage & Make-Ahead Tips
Here’s a little secret—i think the best flavors of shoofly develop if you let the pie rest overnight. after baking, let it cool completely, then cover it tightly with plastic wrap.
Freeze or refrigerate if you plan to keep it longer than a day. the molasses filling can get even more flavorful after a night in the fridge.
When reheating, i recommend a gentle warm-up at 250° f for about 10- 15 minutes. you don’t want to lose that fudgy, sticky texture.
If you’re short on time, just microwave a slice in 20-second bursts, but be careful—it can get too soft if heated too long.
This pie keeps well in the fridge for up to 3 days. after that, the crust may lose some of its crispness but the flavors stay rich and cozy.
Oh, and a tip from my experience—try not to leave this sitting out overnight uncovered, or you risk the crust getting soggy.
Creative Variations & Fun Twists
Feeling adventurous? you can totally put a spin on this shoo fly pie recipe . imagine swapping molasses for dark corn syrup for a sweeter, milder taste.
Want to make it gluten-free? use a good gluten-free flour blend. for a boozy kick, a splash of rum or bourbon into the filling makes it feel fancy—perfect for adult gatherings.
Seasonal ideas? toss in pumpkin pie spices in the fall, or add chopped pecans on top before baking for some crunch.
And regional variations are everywhere! some folks in amish pennsylvania add a touch of apple cider in the filling for a fruity twist.
Nutritional & Health Tips (Because We Care)
I’m not going to pretend this pie’s a health food, but hey, life’s about balance. one slice packs around 330 calories, mostly from the sugar and molasses—so it’s a sweet treat, no doubt.
If you’re trying to cut back, go light on the crumb topping, or share slices with friends, because sharing is caring!
To make it a little healthier, consider using less sugar or gluten-free options. even adding some chopped nuts into the topping boosts fiber and adds extra flavor.
It's all about enjoying comfort food without guilt—it’s a pie in the sky kind of moment, isn’t it?
Wrap-up & Final Cheer
Honestly? making your own shoofly pie is like taking a little trip back in time. it’s a slice of amish pennsylvania history you can share with friends and family.
Whether you’re craving a bit of tradition or just good ol’ sweet comfort, this shoo fly pie recipe delivers every time.
So go ahead—try it. play with flavors, make it your own, and most of all, have fun. baking should be joyful, and nothing beats the moment you cut into that warm, sticky heaven.
Happy pie making, y’all!
Frequently Asked Questions
What makes a good shoofly pie recipe?
A great shoofly pie recipe balances the rich, sticky molasses filling with a sweet, crumbly topping, all encased in a flaky crust. Fresh spices like cinnamon and ginger really elevate the flavor, and proper baking ensures the filling sets nicely without overcooking. Don’t forget to allow it to cool slightly so the filling can firm up before serving!
Can I make shoofly pie ahead of time, and how should I store it?
Absolutely! Shoo fly pie tastes even better the next day as the flavors meld. Store leftovers covered in the fridge for up to 3 days. To reheat, warm slices briefly in the oven or microwave—just be careful not to overdo it to maintain the crust's crispness.
Are there variations of the traditional shoofly pie recipe?
Yes! You can create a crumb-topping version or add nuts for extra crunch. For a dairy-free or gluten-free option, swap out ingredients with suitable alternatives. Some people also experiment with adding a splash of bourbon or using dark brown sugar for a deeper flavor.
Is shoofly pie a sweet or spicy dessert?
It's primarily a sweet dessert, thanks to the molasses and brown sugar. However, it also contains warming spices like ginger, cinnamon, and cloves that give it a subtle spicy undertone, balancing out the sweetness beautifully.
What are some tips for baking the perfect shoofly pie?
Use cold butter and ice water for a flaky crust, and don’t overmix your dough. Keep an eye on the pie as it bakes—you're aiming for a bubbling filling with a golden, crumbly topping. Allow the pie to cool for at least 15 minutes so the filling sets nicely before slicing.

Classic Pennsylvania Dutch Shoo Fly Pie Card
⚖️ Ingredients:
- 1 1/4 cups all-purpose flour (150g)
- 1/2 teaspoon salt
- 1/2 cup unsalted butter, cold and cubed (113g)
- 3-4 tablespoons ice water
- 1 cup molasses (340g)
- 2/3 cup hot water (160ml)
- 1 teaspoon baking soda
- 1 teaspoon ground ginger
- 1 teaspoon ground cinnamon
- 1/2 teaspoon ground cloves
- 1/4 teaspoon black pepper
- 2 large eggs
- 1/2 cup all-purpose flour (60g)
- 1/3 cup packed light brown sugar (70g)
- 1/4 cup unsalted butter, cold and cubed (56g)
- 1/2 teaspoon ground cinnamon (optional)
🥄 Instructions:
- Step 1: Combine flour and salt in a bowl or food processor. Cut in cold butter until mixture resembles coarse crumbs. Add ice water gradually, mixing until dough forms. Gather into a disk, wrap in plastic, and chill in the fridge for 30 minutes.
- Step 2: Preheat oven to 375°F (190°C). Roll chilled dough on a floured surface to fit a 9-inch pie dish. Transfer to pie dish, trim excess, and crimp edges.
- Step 3: In a saucepan, combine molasses, hot water, and spices. Bring to a gentle simmer over medium heat. Remove from heat and whisk in eggs quickly. Dissolve baking soda in hot water and add to the mixture. Pour filling into the prepared crust.
- Step 4: Mix flour, brown sugar, and cinnamon (if using). Cut in cold butter until crumbly. Sprinkle evenly over the filling.
- Step 5: Bake uncovered for 40-45 minutes until bubbling and topping is golden brown. Check doneness by gentle wobble; edges should be set.
- Step 6: Let cool for at least 15 minutes to set. Serve warm or at room temperature, optionally with whipped cream or vanilla ice cream.
Previous Recipe: My Favorite Hearty Split Pea Soup with Ham: A Cozy Classic
Next Recipe: My Favorite Creamy Crock Pot Mac and Cheese Recipe for Cozy Nights