Crafting Charming Rustic Christmas Decor
Bring warmth to your home with rustic Christmas decor! Create charming centerpieces and wreaths using natural materials. Get crafting tips inside!

Creating Your Cozy Rustic Christmas Decor
A Little Holiday Story to Start
Every year, when the first hints of winter chill the air, i find myself deep in a box of old ornaments, family photos, and memories.
I can almost hear my grandma's laugh as she bustled around our log cabin, making it feel like the coziest place on earth.
You know that feeling? the warmth of nostalgia and the joy that comes with decorating? it kicks off my favorite season, and this year, i’m all about rustic christmas decor .
So, why not bring a bit of that charm into our homes this season? let’s dive in together!
A Glimpse into Rustic Decor History
Historically, rustic decor draws from rural traditions and embraces natural elements, like wood and greenery. it’s the kind of thing you’d see in cabins or old farmhouses, where everything feels warm and inviting.
Today, rustic aesthetics are super popular, especially during winter. people want their homes to reflect a sense of comfort and simplicity, which is why you’ll see more diy crafts and country christmas decorations popping up in every corner.
This kind of decor doesn’t have to break the bank either! most projects can be done with items you can find around your home, in your backyard, or at your local craft store.
Believe me, you won’t need to spend a fortune to create stunning pieces. you might find that, with a little effort, it’s not just easy but can also yield an impressive amount of decor!
Why Rustic Christmas Decor? The Benefits!
Okay, let’s get real for a second. why should you bother with these projects? for starters, rustic christmas decor is not only visually pleasing; it’s also pretty healthy for your holiday spirit.
It can be therapeutic! crafting something with your hands brings a sense of achievement. plus, many of the materials used are eco-friendly—think woodland christmas vibes with a touch of sustainability.
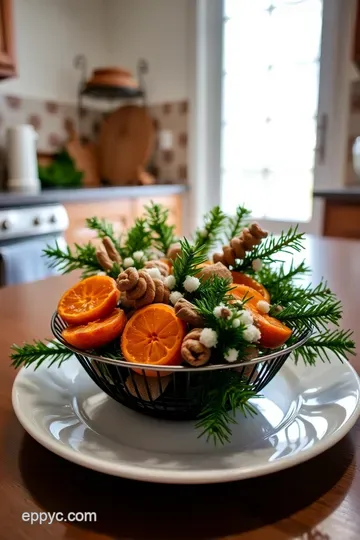
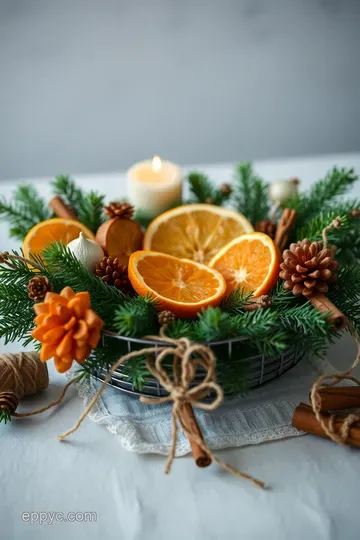
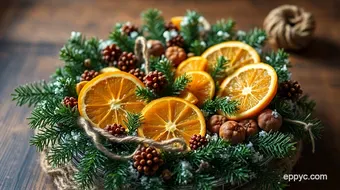
Imagine whipping up delightful centerpieces, like a wooden bowl filled with pinecones and seasonal fruit. it’s not just decoration; it’s a conversation starter! these projects are perfect for cozy family gatherings and holiday parties, inviting warmth that makes everyone feel at home.
And trust me, nothing beats those "oohs" and "aahs" of your friends when they see your handiwork. you might just get crowned the holiday decor queen or king!
Moreover, these decor items are super versatile. use them year after year, changing things up a bit each holiday season.
You can personalize this rustic style to fit various christmas themes decorations , whether it’s a holly jolly christmas or a more subdued, winter decorating vibe.
Time and Costs: What to Expect
Now you might be thinking, “how long will this take?” well, for most projects, set aside about two to three hours , depending on how many items you want to create.
These crafts can be done while you sip on your favorite hot cocoa (or maybe some spiked cider—no judgment here!).
And as for costs, many materials are inexpensive. you can often source pinecones or branches from your yard or go for a leisurely walk in the woods! a little creativity can go a long way, and you’ll be surprised at how much you can whip up for a budget-friendly price.
What’s Next? Gather Your Materials!
Alrighty, friend! are you ready to get your hands a little crafty? you’re going to need a few supplies, and i promise, it’s going to be fun.
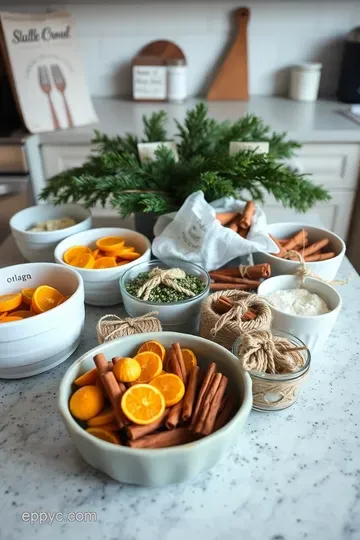
From twine and pinecones to fresh greens and maybe some dried oranges for a pop of color, the materials are widely available.
So, let’s dive into that ingredient list and start making some charming rustic pieces for your home. trust me, once you start crafting, you’ll find it hard to stop.
Your porch will look cozy, inviting, and totally ready for that holiday magic!
Let’s get crafting, shall we?
Essential Ingredients Guide: Crafting Joy with Rustic Flavor
Ready to dive into the world of home cooking? cooking is like decorating for the holidays—each ingredient plays its part, creating depth, flavor, and joy.
Just like how rustic christmas decor warms up your space, your pantry essentials make meals cozy and delightful. let’s break this down into bite-sized sections so you can cook with confidence.
Premium Core Components
First, let’s talk about those premium core ingredients . these are your must-haves. we're talking about butter, flour, oils, and all the good stuff.
It's like having the right ornaments for your country christmas decorations —you know? each one matters!
- Detailed Measurements: For accurate cooking, use 1 cup of flour (125g) or ½ cup of sugar (100g). Trust me, your cookies will thank you!
- Quality Indicators: Always go for the best. Look for rich scents in spices—if they smell flat, they probably are!
- Storage Guidelines: Keep your flour in a cool, dry place; moisture is the enemy! Check that your oils stay sealed and away from direct light to keep them fresh.
- Freshness Tips: Most spices lose their kick after a year. If it’s been that long, give it a sniff! If it’s dull, toss it.
Signature Seasoning Blend
Now, let’s jazz things up with a signature seasoning blend . You can make your meals sing!
- Essential Spice Combinations: A sprinkle of salt, a dash of pepper, and a pinch of garlic powder go a long way.
- Herb Selections: Think fresh rosemary and thyme—pairs beautifully with meats or winter veggies!
- Flavor Enhancers: Do not underestimate good ol’ lemon juice or vinegar ; they brighten up everything.
- Regional Variations: In the South? Try adding a bit of cayenne pepper for a kick! Up North? A sprinkle of sage in your turkey is a must.
Smart Substitutions
Oops, out of an ingredient? No problemo! Here’s where smart substitutions come in handy.
- Common Alternatives: No buttermilk? Mix milk and vinegar ; boom—instant substitute.
- Dietary Modifications: Got a vegan friend? Swap out eggs with flaxseed meal or applesauce .
- Emergency Replacements: If you're out of baking powder, mix 1 tsp of baking soda with 2 tsp of vinegar —life savers!
- Seasonal Options: Pumpkin spice in the winter? Yasss! Try nutmeg or cinnamon when you’re in a pinch.
Kitchen Equipment Essentials
Before you whip up that magical meal, let’s chat about kitchen essentials . You've got to have the right tools at your fingertips to work your magic.
- Must-Have Tools: A sturdy cutting board, a chef’s knife, and mixing bowls. Keep it simple!
- Alternative Equipment: No whisk? Grab a fork! No sifter? Use a mesh strainer! Trust me; you won’t be doing a whole workout!
- Preparation Tips: Chop all your veggies before starting. It saves time and keeps things chaos-free.
- Storage Solutions: Invest in good-quality containers for those herbs and spices. You’d be surprised how long they last in airtight jars!
And there you have it, folks! you’re now ready to deck the halls with flavor while whipping up some heartwarming dishes.
Much like how you would channel your woodland christmas vibe into your home, bring those same vibes into your cooking!
With the essentials covered, it’s time to roll up your sleeves and get to the fun part! let’s see how you can use all these ingredients and tips to create some scrumptious meals or dazzling christmas centerpieces diy projects.
Grab your apron, and let's cook up a storm!
Mastering Professional Cooking: An Expert's Guide
Ah, the kitchen! it’s like a playground for adults, right? whether you’re a home cook or dreaming of culinary stardom, knowing some professional cooking methods can truly elevate your skills.
Let’s dive into this tasty topic, focusing on essential preparation steps, detailed processes, expert techniques, and of course, those success strategies.
Grab your apron, and let’s get cooking!
Essential Preparation Steps
Before you even think about firing up the stove, there are a few essentials to nail down. mise en place is your secret weapon.
This fancy french term just means having everything in its place. measure out your ingredients, chop your veggies, and line them up.
It saves a ton of time and keeps your workspace tidy. you'd be surprised how calm it feels when everything is ready to go!
Next up, let’s chat about time management . a pro tip? keep a timer handy. setting alarms for things like when to flip those pancakes or let that roast rest helps you stay on track without burning your meal.
Organization is key too! a cluttered space leads to a cluttered mind. think about your workflow—have your pots, pans, and utensils easily accessible.
Safety considerations are super important as well. when working with knives or hot surfaces, always focus on safety. keep a first aid kit close, and remember, a sharp knife is safer than a dull one!
Step-by-Step Process
Alright, let’s break it down, step by step. first, make sure you're familiar with your oven and stove settings. for instance, if you’re baking cookies, aim for a temperature of 350° f .
If it’s too hot, they’ll burn faster than you can say “sugar cookie!”
Keep an eye on your timing, too! most recipes have a recommended cook time. to get that perfectly golden roast chicken, you’ll want about 1 hour and 15 minutes at 375° f .
The key is patience; using visual cues for doneness —like color and texture—can make all the difference.
Expert Techniques
Now, let’s sprinkle in some expert techniques. ever heard of sous-vide? it’s fancy, but really, it’s just cooking food in a sealed bag submerged in water at a precise temperature.
This method locks in flavor and moisture, and it's convenient!
When it comes to critical steps, don’t skip that rest period! Letting your meat rest after cooking allows the juices to redistribute—trust me, this makes for a juicier bite.
Quality checkpoints are crucial. tasting as you go will help you adjust seasonings and flavors before serving your culinary masterpiece.
And if something goes wrong, don’t panic! troubleshooting is part of the process. a little bit of salt or a splash of lemon juice can work wonders.
Success Strategies
Let’s wrap things up with some success strategies . One of the biggest mistakes to avoid is overcrowding the pan. That leads to steaming instead of browning, and nobody wants that!
Always taste your food during the cooking process. it’s all about that quality assurance. want perfect results? try keeping a cooking journal.
I did, and it’s helped me pinpoint what worked and what didn't. plus, you’ll remember those special holiday recipes, like those rustic christmas decor-themed treats, for years to come.
Honestly, don't shy away from make-ahead options. Dishes like lasagna or casseroles can be prepped ahead of time and baked just before the guests arrive. It’s a lifesaver during busy holidays!
Cooking can be as calm or as chaotic as you want it to be! embrace the journey, savor those flavors, and don’t forget the joy it brings to your table—like cozy outdoor christmas decor creating a warm atmosphere for your loved ones to gather around.
Additional Information
As you experiment with your cooking, think about how it all fits into the bigger picture. just like you style your home with country christmas decorations or plan your holiday centerpiece diy… each dish reflects your creativity and spirit.
So, whether it’s a gourmet meal or rustic christmas decor, getting it right takes practice and passion. keep it fun and effortless, just like good food should be!
Additional Recipe Information: Crafting Rustic Christmas Decor
Let’s dive into the nitty-gritty of creating rustic christmas decor ! trust me, it’s not just about putting things together; it’s about art, love, and a whole lot of holiday spirit.
Whether you're decking the halls solo or having a craft night with friends, i've got some pro tips and secrets up my sleeve.
Pro Tips & Secrets
First off, time-saving techniques are key! if you're feeling ambitious, gather all your materials in one go. this way, you can whip up your rustic decorations without running to and fro.
I can’t tell you how many times i’ve lost my momentum because i forgot to grab something!
When it comes to flavor enhancement (think scent here), add a few sprigs of fresh rosemary or cinnamon sticks to your arrangements.
Seriously, the smell will make your house feel like a cozy cabin in the woods. talk about holiday decorating ideas that double as aromatherapy!
Now let's get fancy with presentation advice . don’t just toss your ornaments around; arrange them in clusters of odd numbers—it's a little trick for aesthetic appeal.
Trust me, it makes a difference!
Perfect Presentation
When you're setting up your decor, plating techniques are super important. place your centerpiece at eye level for max visual impact.
Think about layering too; stack some pinecones or dried fruits on top of each other in your bowl.
For garnish ideas , i’m all about the natural look. use twine or burlap for a touch of the countryside.
Throw in color combinations that scream winter: deep greens, rich reds, and rustic browns. it’s like a warm hug for your eyes! don't be afraid to add a few pops of white or gold to elevate that cozy outdoor christmas vibe.
Storage & Make-Ahead
Wondering about storage guidelines ? after all that crafting, you’ll want to keep your goodies safe until the big day.
Store your decorations in airtight containers to protect them from dust and moisture. trust me, no one wants their beautiful centerpiece looking like it went through a snowstorm!
As for preservation methods , keep everything in a cool, dry place to maintain freshness. And when it’s time to roll them out next year, a little fluff and reshape might be all you need!
For reheating instructions —well, this is a bit different than your turkey leftovers! Just set them back in place with a little love, and they'll be good as new.
Creative Variations
Feeling adventurous? you can make flavor adaptations in your decor! swap out traditional pine for cedar or even eucalyptus for a trendy touch.
Dietary modifications don’t apply here, but if you want to skip the fruit in your centerpiece, go for some artificial ones that look just as good!
Seasonal twists could include using holiday decorations from other cultures—like colorful papel picado for a more vibrant touch. embrace regional variations —look to local nature for inspiration.
Dried sage from your garden or even succulents can add a unique twist to your rustic christmas decor.
Complete Nutrition Guide
Let’s talk complete nutrition guide —well, sort of! while crafting isn’t about calories, using natural materials means you’re creating a healthy and eco-friendly atmosphere.
Plus, decorating with your kids can promote family bonding and creativity!
Closing Thoughts
So, grab those supplies, turn on some christmas tunes (i swear every time i hear “jingle bells,” my heart skips a beat), and dive into the joy of crafting.
Channel your inner martha stewart, or just have fun! remember, it’s not about perfection; it’s about making memories. you got this!
With these cozy outdoor Christmas decor ideas, you’ll turn your home into a rustic wonderland that’ll wow your guests. Happy crafting, and may your Christmas be filled with warmth and joy!
Frequently Asked Questions
What materials do I need for making rustic Christmas decor?
To create charming rustic Christmas decor, you'll need natural elements such as evergreen branches, dried oranges, cinnamon sticks, and twine. Essential tools include a hot glue gun, scissors, and wire cutters. Don’t forget to gather some seasonal fruits like apples or pears for your centerpiece!
How long does it take to craft rustic Christmas decor?
Gathering materials takes about 30 minutes, with crafting time typically around 2 hours, especially if you're working on multiple pieces. Overall, expect to spend roughly 2 hours and 30 minutes to create lovely decorations for your home!
Can kids help with making rustic Christmas decor?
Absolutely! Making rustic Christmas decor is a fantastic family activity. Just be sure to supervise with tools like hot glue guns or scissors. Kids can help with simple tasks such as assembling items, decorating, or placing ornaments on the tree.
How can I personalize my rustic Christmas decor?
Add your unique touch by incorporating personal items like special ornaments, or using different colors or textures. For example, consider using dyed air-dry clay for ornaments or adding your favourite scents like cloves or rosemary into your centerpiece for an extra festive feel!
What’s the best way to store my rustic Christmas decor after the holidays?
To keep your rustic Christmas decor in good shape for next year, store items in airtight containers to shield them from dust and moisture. If you have fragile decorations, wrap them in tissue paper for added protection!
Is there a nutritious twist I can add to my Christmas decor?
While the decor itself isn't edible, you could include healthy edible accents as part of your centerpiece, like nuts or dried fruits, which add to the rustic charm and can be enjoyed after the decorations are done! Keep it natural, and be creative with how you incorporate these elements.

Crafting Charming Rustic Christmas Decor Card
⚖️ Ingredients:
- 1 sturdy wire frame (12 inches / 30 cm)
- 2 cups of mixed evergreen branches (e.g., pine, fir)
- 1 cup of dried oranges (sliced)
- 1 cup of cinnamon sticks
- 1 roll of jute twine or natural ribbon
- 1 large wooden bowl or tray
- 1 bunch of Eucalyptus (fresh or dried)
- 3-5 pinecones
- 1-2 red apples (or any seasonal fruit)
- Decorative fairy lights (optional)
- 1 cup of air-dry clay
- 1 twine for hanging
- Natural paint (or non-toxic paint)
- Shapes or cookie cutters for cutting clay
🥄 Instructions:
- Step 1: Secure evergreen branches around the wire frame using jute twine.
- Step 2: Attach dried orange slices and cinnamon sticks at intervals for added visual appeal.
- Step 3: Place eucalyptus in your wooden bowl as a base.
- Step 4: Tuck in pinecones and apples for a festive touch.
- Step 5: (Optional) Add fairy lights for extra sparkle.
- Step 6: Roll out the air-dry clay and cut into desired shapes.
- Step 7: Use a paintbrush to decorate or leave them natural.
- Step 8: Puncture a small hole at the top for twine.
- Step 9: Lay the ornaments on a baking sheet and allow to dry according to package instructions (typically 24 hours).
- Step 10: Hang the wreath on your door or wall, place the centerpiece on your dining table, and decorate your Christmas tree with the clay ornaments.
Previous Recipe: How to Airfry Bacon: My Easy Recipe for Perfectly Crispy Strips
Next Recipe: Easy & Delicious Cheese Biscuits Recipe: My Family's Go-To Cheddar Treat