Homemade Artisan Pizza Dough
Discover the joy of making pizza dough at home! My easy homemade artisan recipe ensures a crispy crust that’s perfect for your favorite toppings. Give it a try!

Creating Your Own Artisan Pizza Dough at Home
Oh my gosh, let me take you back to my very first attempt at making pizza dough at home . i was a wide-eyed rookie, convinced i could whip up a masterpiece like one of those hip pizzerias you see on food network.
I thought, “how hard could it be?” spoiler alert: it’s a bit tricky! but trust me, the smell of freshly baked pizza wafting through your kitchen makes it all worth it.
If you’re ready for an adventure that combines a little science with a lot of heart, let’s dive in!
The Roots of Homemade Pizza Crust
Did you know pizza has roots that stretch back to ancient rome? it started as flatbreads topped with various goodies and evolved into the pie we know and love today.
Fast forward to the modern world, and pizza's popularity skyrocketed! today, we’ve got everything from artisanal options to frozen varieties.
Crafting your own artisan pizza dough from scratch is not just a way to enjoy a classic meal; it’s become a fun weekend project for families and friends alike.
What to Expect: The Doughy Deets
Now, let’s get real. making pizza dough isn’t a spur-of-the-moment task. you’ll need about 15 minutes to whip it up, but then you’ve got a resting time of an hour or so for the dough to rise.
Factor in another 10- 15 minutes for baking, and you’re looking at just over an hour of delicious anticipation.
Don’t sweat it, though; the process isn’t too tough, just a little hands-on—and totally rewarding.
Now, about cost. you can whip up two medium pizzas at a fraction of the price of delivery. with ingredients like high-quality flour, yeast, and olive oil, you might even feel fancy without breaking the bank.
Why You’ll Love This Recipe
Let’s chat about the benefits of this recipe! first off, there's the health angle . homemade dough means you control what goes in it, avoiding all those mystery ingredients often found in store-bought options.
Plus, making it yourself is a great opportunity to sneak in nutrients—like adding herbs directly into the dough for flavor and fun.
And whether you’re hosting a pizza night or a laid-back dinner, this recipe is versatile enough to impress! it’s perfect for everything—from fancy date nights to casual family get-togethers.
Just imagine everyone gathering around a table, rolling out their own dough, and customizing their pizzas. what a blast!
Did i mention the perfect pizza dough texture ? you can achieve a delightful, chewy crust that rivals even the best pizzerias with my tips on pizza dough rising and resting times.
The secret to a crispy pizza crust lies in a hot oven paired with a well-prepared dough. trust me; your friends will think you’ve graduated from a pizza-making school!
Quick Insights Before We Preheat the Oven
Before we jump to the ingredient list, I have a few tips for your pizza dough journey .
- Use Quality Ingredients: Opt for high-quality flour. You won’t regret going the extra mile for that perfect dough.
- Watch That Yeast: Keep an eye on water temperatures! Too hot, and it's game over for your yeast.
- Step Up Your Kneading Game: It’s where the magic happens! Knead until the dough is smooth and elastic.
- Patience is Key: Good things take time. Let your dough rise like the champion it is.
And there you have it! Get ready to channel your inner pizzaiolo. Let’s roll into the good stuff—those ingredients that’ll transform your kitchen into a cozy pizzeria.
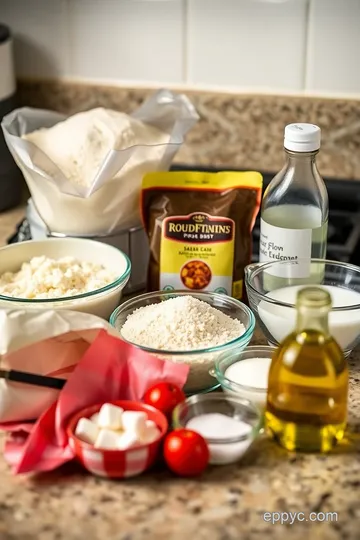
Ingredients You'll Need
For the Dough:
- 3 ½ cups all-purpose flour (440g)
- 1 ¼ teaspoons active dry yeast (4g)
- 1 ½ teaspoons salt (9g)
- 1 tablespoon sugar (12g)
- 1 ¼ cups warm water ( 115° F or 45° C) (300ml)
- 2 tablespoons olive oil (30ml)
Grab your apron – it's time to make some pizza magic!
Essential Ingredients Guide
When it comes to making pizza dough at home , having the right ingredients is key. let's break down what you need to craft that perfect homemade pizza crust recipe.
This guide will set you up with all the essentials—from choosing your flour to understanding the magic of yeast.
Premium Core Components
First up, you gotta nail your ingredients . Here’s the scoop:
-
Flour: get your hands on high-quality flour for pizza . i recommend all-purpose or “00” flour if you can find it.
You want 3 ½ cups (or 440g ). check for a smooth texture.
-
Yeast: use 1 ¼ teaspoons of active dry yeast (about 4g ). when you mix it in warm water, it should get all frothy in about 5- 10 minutes.
If it doesn’t, toss it and start over—fresh yeast is a game-changer!
-
Salt: Don't forget 1 ½ teaspoons (about 9g ). It enhances the flavor, but be careful not to pour it directly on the yeast; it can mess with the rise.
-
Sugar: Just 1 tablespoon (or 12g ) helps feed the yeast. It’s like giving it a little boost.
-
Water: You need about 1 ¼ cups of warm water ( 300ml at about 115° F or 45° C ). Too hot? You’ll kill the yeast.
-
Olive Oil: Bring in 2 tablespoons ( 30ml ) for a tender dough.
Signature Seasoning Blend
Now, let’s talk about seasonings . Sure, you can use the basic salt, but let's jazz things up:
-
Herb Additions: Try adding dried herbs like oregano or basil to personalize your dough. One tablespoon mixed into your dry ingredients works wonders!
-
Flavor Enhancers: You can use garlic powder or even a sprinkle of grated cheese in the dough mix for an extra oomph.
And hey, every region has its own twist! If you’re going for that Neapolitan pizza dough technique , stick with simple ingredients.
Smart Substitutions
Let’s say you’re out of something. Panic not! Here are some smart substitutions :
-
Flour: If you’re low on all-purpose, try whole wheat flour! Just use 50% whole wheat for a nutty flavor.
-
Yeast: Instant yeast can fill in for active dry—no need for activation. Boom, easier!
-
Oil: Unsalted butter is a fine swap if you want a buttery crust.
Kitchen Equipment Essentials
Before diving into making that artisan pizza dough from scratch , grab these must-have tools :
- A large mixing bowl: To mix everything up.
- Wooden spoon or spatula: No fancy gadgets needed.
- Measuring cups and spoons: Trust me, eyeballing isn’t the best for dough!
- Clean surface: Kneading time, baby!
- Pizza stone or baking sheet: Helps achieve that crispy pizza crust we all crave.
Dough Rising & Resting Time
Remember, pizza dough rising tips are crucial. let your dough rise covered for about an hour to double in size.
Patience is key! after that, you can gently punch it down and let it rest for another 30 minutes. this step allows for a perfect pizza dough texture.
Crafting Pizza Dough Variations
Feeling adventurous? Add some herbs right into the dough for flavored pizza dough combinations. A little parmesan or a dash of garlic can elevate your crust!
Now you’re equipped with the essentials. get ready for the fun part—rolling it out and creating homemade pizza topped with all your favorites! whether it’s pepperoni or roasted veggies, the sky's the limit.
Time to dive into the instructions!
Mastering the Art of Professional Pizza Dough
Alright, pizza lovers! you know there’s nothing quite like the smell of homemade pizza wafting through the house, right? today, i’m diving into making pizza dough at home —a simple yet truly satisfying process.
With this easy artisan pizza dough from scratch , you'll have everyone wondering if you’ve got a secret pizzeria in your kitchen.
Essential Preparation Steps
Before you step into this delicious journey, let's kick things off with some essential prep. first, let’s talk about mise en place .
This fancy french term just means "everything in its place." measure out your ingredients beforehand: 3 ½ cups all-purpose flour , 1 ¼ teaspoons active dry yeast , and so forth.
Trust me, it makes everything smoother!
Now, onto time management. set aside about an hour for the dough to rise, plus a little more for baking (that’s around 10- 15 minutes ).
While the dough is working its magic, you can chop up your favorite toppings or uncork a bottle of wine.
Efficiency is key!
Speaking of organization, clear that counter space. It’s where the magic happens. And don't forget safety—keeping it clean is vital. Wash your hands, and don’t let anything cross-contaminate. Safety first, pizza later!
Step-by-Step Process
Here’s where the fun begins! Follow these clear, numbered instructions to nail that perfect dough.
-
Activate the yeast: mix warm water (aim for 115° f or 45° c ) with sugar and yeast. let it froth for about 5- 10 minutes .
It should bubble up—if it doesn’t, toss it and start again.
-
Mix everything: combine your flour and salt in a big bowl. then, make a well in the center, pour in that glorious yeast mixture and add 2 tablespoons of olive oil .
Mix until it looks like a rough dough.
-
Time to knead: dump that dough onto a floured surface. knead it for 8- 10 minutes until it’s smooth and elastic.
Yes, this is where you can really work out some frustrations!
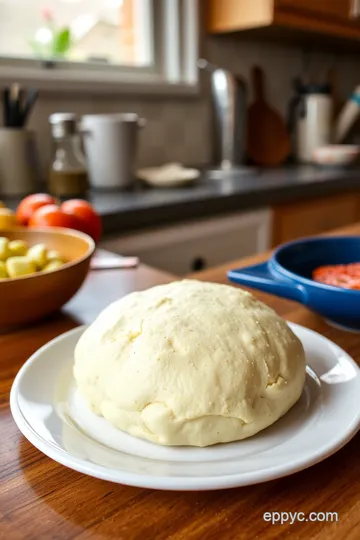
-
First rise: pop it into a lightly oiled bowl, cover it with a towel, and let it rise in a warm spot for about an hour .
When it’s doubled in size, you did it right!
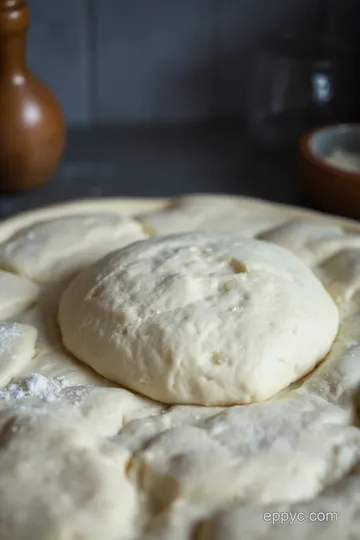
-
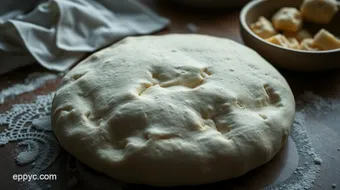
Shape it up: punch down the dough gently, divide it in half (if making two pizzas), and shape each into a ball.
Then let it rest for 30 minutes before rolling it out.
-
Preheat your oven: Crank it up to 475° F ( 245° C) , and don’t forget to put your pizza stone (or baking sheet) in there to heat up, too.
-
Ready, set, bake: Roll out your dough and load on your favorite toppings. Slide it into the oven for 10- 15 minutes until that crust is a beautiful golden brown.
Expert Techniques
Want to take your dough to the next level? here are some expert tips. first, always use high-quality flour for pizza .
This will help create that beautiful perfect pizza dough texture you’re aiming for. and don’t rush the rising time; patience really pays off here!
If all else fails—maybe the dough was too dry or crumbly—don’t panic! just add a tiny splash of water and knead a bit more.
Super common problem, and it happens to the best of us!
Success Strategies
Okay, let’s be honest. We all make mistakes. Avoid rushing through the pizza dough resting time and let it do its thing. Under-risen dough means a chewy, dense pizza—not what we want!
For quality assurance, before taking your pizza out of the oven, peek under that crust. if it’s not golden brown, give it a few more minutes.
And hey, make-ahead options? absolutely! you can store unused dough in the fridge for up to a week or freeze it for a month.
Just pick it out a few hours before you plan on cooking to let it thaw and rise again.
So there you have it, friends! You’ve unlocked the secrets to homemade pizza . With a little practice and a dash of patience, you're ready to impress at your next pizza night.
For the next section, we’ll dive into Additional Information you’ll want to know as you embark on this culinary adventure!
Additional Recipe Information
Pro Tips & Secrets
If you're diving into making pizza dough at home , i've got some secrets to share that’ll elevate your game.
First off, make friends with a good quality flour. you know, that high-quality stuff can make a huge difference in achieving that perfect pizza dough texture.
Think about using bread flour or even "00" flour—it’s a game changer for the chewy crust we all crave!
When it comes to kneading pizza dough , don’t stress! a solid 8- 10 minutes of kneading is key.
Remember, it’s about developing that gluten, so don’t rush it. i swear by the heel of my hand for this—push, fold, repeat! and let’s talk about that yeast magic: your water temperature should be around 115° f (that’s warm but not hot enough to fry your yeast!).
Perfect Presentation
Now that you’ve whipped up some stunning dough and your kitchen smells like an italian pizzeria, let’s talk about making it beautiful.
Once you roll out your dough, you can play around with shapes. a rustic round is classic, but hey, a heart-shaped pizza for date night? yes, please!
For garnishing, fresh basil or arugula on top gives a pop of color and flavor without much fuss. and if you’ve got some good olive oil, drizzle a little on top before serving.
It’s all about that visual appeal . layer dark greens with bright reds from your tomatoes, and watch your pizza become insta-gold!
Storage & Make-Ahead
Sometimes, you gotta plan ahead. if you're prepping for a homemade pizza dinner party, here’s what i do. after you shape your dough into balls, wrap them in plastic and toss them in the fridge for up to 48 hours .
This cold fermentation adds crazy flavor! just make sure to pull it out and let it sit at room temperature for about 30 minutes before rolling out.
If you have leftover dough, store it in an airtight container for about 3-4 days in the fridge. or freeze it for up to 3 months —just make sure to pack it nicely so it doesn't dry out.
When you’re ready for a spontaneous pizza night, pop it in the fridge overnight to thaw!
Creative Variations
Who said you have to stick to the same ol' dough every time? you can get adventurous! add herbs to pizza dough to personalize it.
A tablespoon of dried oregano, garlic powder, or even some red pepper flakes for a kick—yum! you could also swap out half the all-purpose flour for a whole wheat version if you're feeling healthy.
And for seasonal fun, consider flavored pizza dough combinations . How about some roasted garlic in the dough for a winter pizza? Or fresh herbs during summer? You can let your creativity explode, and trust me, your friends will be impressed!
Complete Nutrition Guide
Here’s the real deal: knowing what’s on your plate is just as essential as making it delightful. each serving of your homemade pizza packs a punch with 225 calories and about 6g of protein .
Plus, you’re in control of the ingredients, so you can ditch all the preservatives and unwanted stuff from takeout.
If that’s not enough, being mindful of portion sizes is vital. aim for about a 1/3 of the pizza per serving, and maybe pair it with a crisp salad which adds fiber and makes the meal more balanced.
When you whip up your own dough, you can truly customize it to meet any dietary considerations you or your guests may have.
Wrapping It Up
So, the next time you think about ordering in, remember that making pizza dough at home can be an entire experience! from the kneading to the toppings, you now have all the info to nail that homemade pizza crust recipe .
It might just become your favorite weekend ritual.
Get your friends or family involved—it's more than just a meal; it’s a fun activity! pour a drink, roll that dough, and enjoy the process.
Trust me, once you dive into this homemade pizza adventure, you’ll never look back. happy pizza-making! 🍕
Frequently Asked Questions
What is the best way to store leftover pizza dough?
To store leftover pizza dough, wrap it tightly in plastic wrap or place it in an airtight container and refrigerate for up to 3 days. You can also freeze the dough for up to 3 months. Just make sure to let it thaw in the refrigerator overnight before using, and allow it to come to room temperature before rolling it out.
How can I make pizza dough without yeast?
If you're looking to make pizza dough without yeast, you can use a recipe that includes baking powder instead. This quick dough will not have the same rise or texture as traditional dough but can be made in a matter of minutes, with the right proportions of flour, baking powder, water, and olive oil.
What are some tips for making pizza dough at home for beginners?
For beginners making pizza dough at home, ensure you use warm water (around 115°F or 45°C) to activate the yeast properly, and be patient during the kneading and rising phases to achieve the perfect texture. It's also helpful to measure your ingredients accurately and to keep the dough in a warm area while it rises, as this will help it proof successfully.
Can I substitute all-purpose flour with whole wheat flour for the pizza dough?
Yes, you can substitute up to 50% of the all-purpose flour with whole wheat flour for a healthier version of your pizza dough. This will provide a nuttier flavor and a denser texture. Just be mindful that you may need to adjust the hydration level slightly, as whole wheat flour absorbs more water.
How long does it take for pizza dough to rise, and why is this important?
The pizza dough should rise for about 1 hour, or until it has doubled in size. This rising process is crucial as it allows the yeast to create air bubbles, making the dough light and chewy. Skipping this step can result in a dense and flat crust.
What other ingredients can I add for flavor in my pizza dough?
You can enhance the flavor of your pizza dough by adding herbs, such as dried oregano or thyme, to the dry ingredients. Additionally, using flavored oils like garlic-infused olive oil instead of regular olive oil can elevate your dough's taste. Experimenting with options like nutritional yeast can also give it a distinctive flavor.
Homemade Artisan Pizza Dough Card
⚖️ Ingredients:
- 3 ½ cups all-purpose flour (440g)
- 1 ¼ teaspoons active dry yeast (4g)
- 1 ½ teaspoons salt (9g)
- 1 tablespoon sugar (12g)
- 1 ¼ cups warm water (115°F or 45°C) (300ml)
- 2 tablespoons olive oil (30ml)
🥄 Instructions:
- Step 1: In a small bowl, combine warm water, sugar, and yeast. Let sit for about 5-10 minutes until frothy.
- Step 2: In a large bowl, whisk together the flour and salt.
- Step 3: Make a well in the center of the flour, pour in the yeast mixture and olive oil, and stir until a rough dough forms.
- Step 4: Transfer to a floured surface. Knead for about 8-10 minutes until smooth and elastic.
- Step 5: Place in a lightly oiled bowl, cover with plastic wrap or a damp towel, and let rise in a warm spot for about 1 hour, or until doubled in size.
- Step 6: Gently punch down the dough, divide in half if making two pizzas, and shape each portion into a ball.
- Step 7: Allow the dough to rest for another 30 minutes on the counter before rolling out.
- Step 8: Meanwhile, preheat the oven to 475°F (245°C) and place a pizza stone or baking sheet inside.
- Step 9: Roll out or stretch the dough to your desired thickness, then add toppings.
- Step 10: Transfer to the hot pizza stone or baking sheet and bake for 10-15 minutes until the crust is golden brown.
Previous Recipe: Savory Cracked Oats Breakfast Bowl with Poached Egg & Greens
Next Recipe: Hearty & Nourishing Caldo de Verduras: My Favorite Comfort Soup